Like Me on Facebook

Wednesday, March 30, 2011

Cherry Upside Down Cake~Bonnie Dare's Recipe

I saw this cake on justapinch.com and thought wow! Looks so yummy and its so easy! This is something I can make for dessert on a week night when time is limited! So I decided to try it last night...Needless to say there is one helping left and my family loves it! Thanks Bonnie it truly is Delish!!


The cherries start off on the top and sink to the bottom while baking, the top stays white as snow : )
1 box of white cake mix (or chocolate or yellow)
2 cans of cherry pie filling (i like ruby red)
whipped cream to taste.


Cook's Tip: I found that in my oven, it took about 50 minutes for the cake to get done. I tented it with foil to slow the browning. Check with a tooth pick in the middle and if it comes clean, it is done. Cake will pull away from the sides of the pan.
PREPARE THE CAKE:
In a large mixing bowl, place the cake mix and the ingredients according to the directions on the box. Grease a 9x13 inch metal pan with Pam. Pour the batter in the pan.
Spoon pie filling, about 2 or 3 cherries at a time, evenly distributed over the batter. All the cherries and filling will sink to the bottom while it is baking. (I know, it is hard to believe, but trust me, it is true!)

BAKE THE CAKE:
Place the cake in the oven and bake according to the package directions. Note that it may take more than the time indicated. Use the toothpick test to check if it is done. Cool the cake 15 minutes, then flip over on a foil lined tray. Cut into 12 slices to serve. Top with a dollop of whipped cream. Enjoy!

Secret Kiss Cookies/Russian Tea cakes with a Twist

Nana made these pecan balls that i absolutely loved and then she would make the same cookies and wrap a hershey kiss inside them..what isnt better with chocoalte inside : ) I was enjoying these long before Hershey added the recipe to their website. I still have Nana Devines handwritten recipe card from over 25 years ago <3


Secret Kiss Cookies

2 stk  butter, softened
1/2 c  sugar
1 tsp  vanilla extract
1 3/4 c   all purpose flour
1 c  chopped pecans or walnuts
30-36  hersheys kisses, unwrapped
powdered sugar


Beat butter, granulated sugar and vanilla in large bowl until fluffy.
Add flour and walnuts and beat on low speed of mixer until well blended.
Cover and refrigerate 1 to 2 hours or until dough is firm enough to handle.
Heat oven to 375°F.
Shape about 1 tablespoon of dough around each hersheys kiss and roll to make ball. (Make sure chocolate is completely covered) Put cookies on ungreased cookie sheet.
Bake 10 to 12 minutes or until cookies are set but not brown.
Cool slightly. While cookies are still slightly warm, roll them in powdered sugar. Cool completely. (I roll mine again after cooled)
If you prefer you can mix together cocoa and powdered sugar and roll them in that.

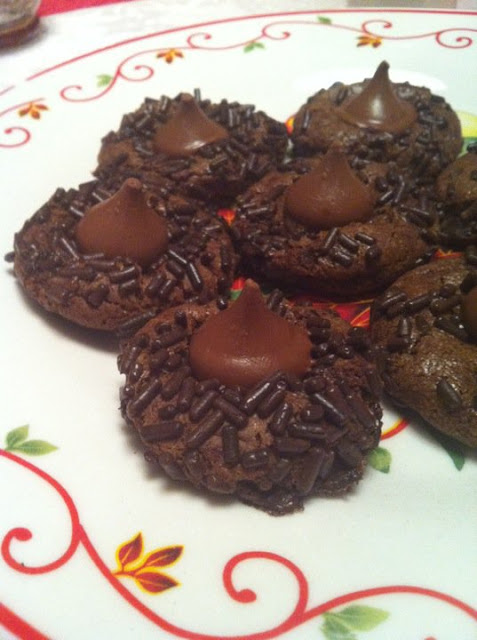
Death By Chocolate Cookies

I came across this recipe on the internet last year around Christmas and had to try them since everyone in my house loves chocolate. Needless to say they will be staying on the christmas cookie baking list : )


Death By Chocolate Cookies

16 1/2 oz package of refrigerated chocolate chip cookie dough
1/3 c  unsweetened cocoa powder
2/3 c  chocolate-flavored sprinkles
2 Tbsp  milk
40 hershey’s kisses, unwrapped
you can use any flavor or combinations of flavors of kisses of course : )

Preheat oven to 375 degrees. And lightly grease a cookie sheet.
Mix cookie dough and cocoa together with clean hands. Until completely mixed. You can also do this by putting the dough and the cocoa into a ziplock bag and kneading it until well mixed.
Put chocolate sprinkles in a shallow bowl and milk in a seperate shallow bowl.
Roll dough into balls about one inch around. Dip the cookie balls into milk just to moisten and then roll in the sprinkles.
Place cookie balls 2 inches apart on lightly greased cookie sheet.
Bake about 8 or 9 minutes until the edges are firm.
Immediately press a kiss lightly into the center of each cookie. Remove to wire rack and cool

Cherry Chocolate Chip Cookies al'orange

Ok so my son wanted to make his own cookies while i was baking one day. So i gave him a choice of cake mixes to start off with (making it easier for him) and he chose orange, then i put all kinds of mixins out on the counter and told him to choose what he wanted to put in his cookies. He chose dried cherries, chocolate chips and orange extract. This is his recipe and if I do say so myself he did a great job!! Every one gobbled them up!

Cherry chocolate chip al'orange cookies (yes hunter named them)


1 bx  orange cake mix
1/4 c  vegetable oil
2 Tbsp  water
2   eggs
1/4 tsp orange extract
3/4 c   milk chocolate chips
3/4 c   dried cherries
 melted chocolate or chocolate icing for decorating


Mix cake mix, water, oil, extract and eggs together in bowl.

Fold in the chocolate chips and the dried cherries.

Drop onto cookie sheet lightly coated with cooking spray.

Bake for 10 to 12 minutes. Then cool on sheet for a minute and transfer to rack.

Decorate with chocolate if desired.


I'm back

Well, knocking myself senseless and into a concussion last Thursday has put a major damper on things for me. Havent been spending much time online since it added to the headache and nausea, so therefore havent posted any recipes : (

But I am feeling better and ready to go : ) I think I will start off with a few desserts : )

Saturday, March 26, 2011

CrockPot Candy

I was on Face book and this recipe popped up in the ads section. I clicked on it and although I havent tried it yet (just snagged the recipe now) I am posting it so I dont forget to lol. So this is borrowed from "Just a Pinch, recipe Club" and was submitted there by Donna Brown


Crockpot Candy Looks Delish!

1              16 oz. jar roasted, unsalted peanuts
1              16 oz. jar roasted, salted peanuts
1              12 oz. package semi-sweet chocolate chips
1              bar (4 ozs.) german chocolate, broken into pieces
3              lbs. (two 24 oz. pkgs.) white almond bark, broken into pieces

Directions
1
Put ingredients into a 4 or 5-quart crockpot in EXACT order as listed. Cover and cook on low 3 hours. DO NOT remove lid! Turn off and allow to cool slightly. Mixture will not be melted but will be soft. Mix thoroughly and drop by teaspoon size cookie dropper or a teaspoon onto wax paper. Let cool thoroughly. Makes approximately 150 - 170 pieces.

NOTE: This candy is made best by following the recipe to the letter. Make other variations and changes at your own risk, as this is the voice of experience speaking. Please take into consideration that it may alter the quality of the finished product.

No Bake Rocky Road Candy Cups

 No Bake Rocky Road Candy Cups


Okay so Brittney and I found this recipe right before Christmas online and decided to add it to our long list of Christmas goodies we make. The lesson we learned from making these? Never make one batch. They disappeared within the hour and have been requested non stop ever since!


     11-oz. package peanut butter and milk chocolate chips (i cant find them mixed here so I buy a bag of each and since I need alot of these I double the recipe, you can use half bag of each if you prefer)
     2  tablespoons  creamy peanut butter
     1  cup  crispy rice cereal
     1  cup  miniature marshmallows
     3/4  cup  unsalted roasted peanuts, chopped

Preparation

Microwave peanut butter and milk chocolate chips in a large glass bowl on high for one to 2 minutes or until melted, stirring every 30 seconds. Stir in peanut butter until well blended.

Stir in rice cereal, miniature marshmallows and chopped peanuts. Spoon mixture by heaping tablespoonfuls evenly into miniature paper candy cups. Chill one hour or until firm.
The following recipes aren't really recipes so to speak but fun food projects to do with the little ones or for the little ones to take to school to share with classmates or maybe as treats at parties. Just thought I would include them since they are a few of the fun projects we make for Easter.

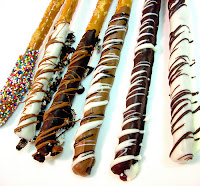
Chocolate Dipped Pretzels/Penny Sticks


You will need milk, white and or dark chocolate to dip the pretzels in, and assorted candies and toppings such as m&m's and sprinkles, if you like the drizzled over effect then a pastry bag to drizzle additional assorted chocolate over the pretzels. 
Melt chocolate in microwave or on top of stove. Dip pretzels till about 3/4 covered and then immediately roll in desired topping. If you want to drizzle additional colors over them wait until they dry and then drizzle.

You can also do this same effect with Jordan Crackers, simply dip crackers in chocolate, and roll tips in desired topping. I prefer mine dipped in milk chocolate with no toppings, just like Gertrude Hawks makes <3


Marshmallow Cupcake Lollipops


I found this recipe on another blog a few months back and made them as a gift for a childs party. I filled a small basket with the tasty treats and then wrapped it in colored cellophane and tied pretty ribbons around it.  


     Large strawberry-flavored marshmallows
     Dark chocolate candy melts (since I dont like dark chocolate I use milk chocolate)
     (I also put a bit of white chocolate over the milk on some to make them look like     cmps,Thats a pennsylvania thing i think cause i cant seem to find them in any ice cream shop in miami)
     Lollipop sticks
     Nonpareils-sprinkles
     Red candies (Red Hots, M&M’s, etc.)
     Styrofoam rectangle
     Ribbon (optional)

Insert lollipop sticks into marshmallow centers and set aside

Melt chocolate pieces in double boiler, stirring frequently.  Dip marshmallow tips in chocolate sauce. You can repeat this if marshmellows are not covered evenly. (If adding the white chocolate for a marshmellow topping over the dark chocolate allow this to dry and then dip a smaller amount in the white chocolate, then go to next step)

Immediately sprinkle pops with nonpareils and top with a single red candy.  Use foam base to keep them upright while drying.

Tying ribbon around each stick is optional but they do look so very pretty!!


Marshmellow Peanut Butter Egg Candies


When peanut butter and marshmellow meet the taste buds get an incredibly delectible treat!  

Marshmellow Peanut Butter Easter Eggs

     6 ounces (3/4 cup, or 12 tbsp) butter, softened
     3 cups powdered sugar
     1/2 cup peanut butter
     1 cup marshmallow creme or Marshmellow Fluff
     1/2 cup salted peanuts, chopped
     1 tsp vanilla extract
     1 lb peanut butter candy coating (or you can use chocolate) the pic is shown with peanut butter coating but when i make them with the chocolate coating i will post that pic!

Preparation:

1. Place the butter and 1 cup of powdered sugar in the bowl of a large electric mixer. Mix them on medium speed until the mixture is light and fluffy.

2. Stop the mixer and add the peanut butter, marshmallow crème, 1/3 cup of the peanuts, and the vanilla. Mix on medium until well-blended. Gradually add the remaining powdered sugar, 1/2 cup at a time, until the candy is a workable texture: not too sticky and easy to handle. If necessary, add a little more powdered sugar to get it to a workable consistency.

3. Using a spoon, scoop up a small amount of candy and roll it between your hands until it is an oblong egg shape. Place it on a baking sheet lined with aluminum foil and repeat with remaining candy until you have approximately three dozen eggs.

4. Put the eggs in the refrigerator to firm up for an hour. Once firm, place the candy coating in a microwave-safe bowl and microwave in one-minute increments until melted, stirring after every minute to prevent overheating.

5. Once the coating is melted, dip the eggs in the coating and replace them on the foil-covered sheet. While the eggs are still wet, sprinkle the tops with the remaining chopped peanuts. Refrigerate for 30 minutes to set the coating. Marshmallow-Peanut Butter Easter Eggs can be stored in the refrigerator in an airtight container for up to a week. They are best served at room temperature.

Homemade Peeps

Who doesnt think of those cute little chicks and bunnies made out of marshmellow and coated in sugar when we think of Spring or Easter? These are two great recipes to make your own at home. In one recipe you have to "pipe" the marshmellow into shapes. It requires some patience and time but the end result can be adorable. The other tastes just as great but uses cookie cutters in the shapes you choose rather than piping. Its easier and equally as cute. Choose whichever you like best and have fun with it.

Some tips: When piping I use a larger bag to hold the marshmellow. It can dry out quickly in the smaller bag making it more difficult to pipe.

I purchase colored sugar instead of tinting my own. It saves on time and you dont have to worry about sifting out globs of wet sugars.

For making eyes, rather than making icing to add the tiny eyes to my creations i purchase a small tube of black icing. Less waste and less work.


The above pictures were borrowed from the internet. As soon as my concussion leaves me lol I will be making these with my son and we will post our own pics. But I wanted you to have an idea on what they will look like. You can use cookie cutters in any shape and make these for different holidays and times of year. I have done hearts for Valentines day and shamrocks for St. Pattys however I prefer making them at Easter time only, its just another little something to look forward to.


Marshmellow Peeps (Piped) 
(Taken from a Martha Stewart Cookbook) ( The standing bunnies and chicks and the pic of the piping process came from her website)


     1 unflavored gelatin (2 1/2 teaspoons)
     1/3 cup cold water for gelatin, plus 1/4 cup for syrup
     1 cup sugar

      In the bowl of an electric mixer, sprinkle gelatin over 1/3 cup cold water. Allow gelatin to soften, about 5 minutes.

      In a small saucepan, combine 1/4 cup water and sugar, and stir over medium-high heat until sugar is dissolved. Stop stirring, and place a candy thermometer into sugar water; wipe sides of pan with a wet brush if sugar crystals have splattered up. Boil sugar until temperature reaches the soft-ball stage (238 degrees). Remove syrup from heat; add to softened gelatin. Using the whisk attachment of an electric mixer, hand-stir the mixture a few minutes to cool; place bowl on the mixer stand. Beat on medium high with the whisk attachment until soft peaks form and the marshmallow mixture holds shape, 8 to 10 minutes.

Bunny How-To
1. Pipe a small marshmallow mound onto sugar, about 1 1/2 inches long and 1/2 inch tall. Pipe two smaller mounds on either end for the head and tail.

2. Pipe the ears, starting from the top of the head onto the body, pulling forward and off to finish. With a damp finger, pat down any marshmallow spikes formed from piping.

3. Immediately sprinkle sugar over the entire surface of the bunny. Allow a few minutes for the shape to set.

4. Pipe on a icing face with a #1 Ateco icing tip;(I use the tip on the small tube of black icing)  lift bunny out of sugar with a spoon or small offset spatula. Place in a parchment-lined airtight container until ready to serve, or for up to 2 weeks.


Chick How-To
1. Pipe an oval shape onto sugar, about 1 inch wide, tapering the end and pulling upward to finish with the tail.

2. For the head, pipe a mound on the end opposite the tail, about the width of the body, pushing toward the tail and up. Pull away from the head to form the beak.

3. Immediately sprinkle sugar over the entire surface of the chick. Allow a few minutes for the shape to set.

4. Pipe on icing eyes with a #1 Ateco icing tip; lift chick out of sugar with a spoon or small offset spatula. Place in a parchment-lined airtight container until ready to serve, or for up to 2 weeks.


Marshmellow Peeps Cookie Cutter Style

 1/2 C cold water, divided in half
     1/4 C light corn syrup
     Pinch of salt
     3/4 C sugar
     1 t unflavored gelatin
     1/2 t vanilla
     Colored sugar (or make your own with food coloring and sugar)
     Cocoa powder and water (optional; for eyes and nose) (i use a small tube of the black   icing found in grocery store)

In a small saucepan, combine 1/4 C cold water, corn syrup, sugar and pinch of salt. Whisk together over medium heat. Once sugar is dissolved, let sit unstirred until mixture reaches softball stage (around 235-240°F).

While sugar mixture is boiling, sprinkle gelatin over remaining 1/4 C cold water in a large, deep heatproof bowl (a stand mixer bowl is perfect for this). Let stand for about 1 minute, until it softens. Beat this at medium speed.

Once sugar mixture reaches softball stage, remove from heat and carefully pour into gelatin, avoiding the beaters and sides of the bowl. Immediately begin mixing on high speed, for 5-8 minutes, until mixture increases in volume and turns white and thick. Add vanilla and beat for a minute more.

Pour into a lightly greased casserole pan. Refrigerate for 4-6 hours or overnight.

Using lightly greased cookie cutters, cut desired shapes out of marshmallow. Drop onto a plate covered with colored sugar and cover all surfaces. To make eyes and nose, sprinkle some cocoa powder on a clean plate. Dip a toothpick in water and then dip wet tip into cocoa. Dab dots onto sugar covered marshmallow.
Spring is here

Finally winter seems to be behind us (well at least here in Miami) and Spring has been showing signs of its arrival. With it comes Easter, and there are soo many yummy things to make and create for this wonderful spring holiday. I love making all the cutsie things that I can do with my family. I am going to start posting the recipes even though I havent started to make them this year. I have never really taken pics of my concoctions until I started making my daughter a cookbook to have when she decides its time to leave the mamas nest. So I will be using pics I grab off the internet until I actually make them this year and photograph them. Then I will switch them out for my own. But if your anything like me, when i try a new recipe I want to see what its suppose to look like. So if I do not have a pic of my own right now i will search for one that comes close to what mine looks like. : ) They will all eventually be swapped out for my own since I make these goodies every year and now is the time to start <3

Friday, March 25, 2011

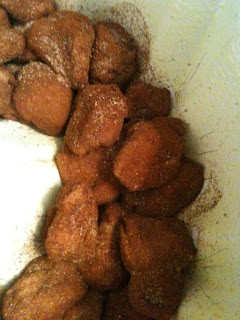
Oh So Easy OOEY GOOEY Monkey Bread

Recently I made my daughter a cookbook filled with over 200 pages of pics and recipes for everything I have been handed down from my grandmas, aunts, etc thru the years. All the recipes in there are 100% homemade and all taste incredible. However as a single mom who works fulltime and then has a little one to do homework with, a house to clean, laundry to do, dinner to cook etc etc etc, I have over the years found many recipes that fit into my crazy busy schedule and give me alot less time in the kitchen and alot more time with my children. Although on weekends and days off such as spring break, winter break and summer break, I prefer to use my good old fashioned handed down thru generations recipes, during the busy work week I rely on the recipes that I have either found or adapted that are easy and less time consuming. This makes it possible for me to cook dinner and make dessert and still have time for all the other things us busy moms have on our agendas. This recipe for monkeybread is a favorite. It's ooey and gooey and even though the dough is premade it still tastes homemade.

 Monkey Bread, All OOEY AND GOOEY and Delicious

3 12-ounce tubes refrigerator biscuits, or rolls, I use Pillsbury
1 cup sugar
3 tablespoons cinnamon (I tend to use more I love cinnamon)
1/2 cup butter
1 1/2 cup brown sugar
1/2 to 1 cup chopped pecans or walnuts depending on your liking
1 tablespoon cinnamon (again I tend to use more)
1/2 cup raisins, dried currants, dried cranberriesor something similiar that you like


Remove rolls from packages and cut each roll in half lengthhwise  twice. Then pull them apart into the quarter sections.


Spray a bundt pan well with cooking spray.

In a zip lock bag, pour  1 cup  sugar, and  3 tablespoons cinnamon.  Zip it closed and shake  to mix.  Put 1/2 of the cut up biscuits/rolls into the bag, zip to close, and shake until all the pieces are covered completely. Now arrange these pieces in the pan.


Put the remaining pieces into the ziplock bag.  Shake well and coat completely but do not remove from bag.
Begin to melt  butter and brown sugar in a saucepan.  Stir frequently until butter and sugar begin to melt, then continue stirring until  sugar is dissolved.  Boil for about 1 minute.


Pour half the boiled syrup mixture over pieces of dough in the bundt pan..  Sprinkle with 1/4 cup of the pecans, and half of the remaining cinnamon.  Cover this layer with  remaining pieces from the ziplock bag, and pour the remaining half of the  syrup over the top of the second layer.  Cover with the rest of the nuts and cinnamon.

Bake at 350F for 40-45 minutes.  Remove from the oven and allow to set in pan for at least 10 minutes.  After about ten minutes turn the pan over onto a serving dish or platter.  The pan and the bread will still be very hot, so use caution.

To serve pull apart bread.

To serve leftovers heat in oven on 350 for about five to ten minutes

Pennsylvania Dutch Chicken Bot Boi (Pot Pie)


When we were kids we lived in Lancaster Pennsylvania for awhile. My dad loved that area and he loved the Pennsylvania Dutch and how they lived. Most of all he loved their foods! Making "Chicken Pot Pie" this past week made me remember a dish dad got from the ladies in Lancaster. Mom would make this all the time for him and it was so incredibly yummy. Bot Boi are actually the noodles used in the dish. There is no crust in this recipe, it is a chicken stew basically that is absolutely amazing. If you cannot find the correct noodles (kluski) in your grocery store I have a recipe to make them homemade.

  8 cups water
  One 3-1/2 to 4 pound stewing chicken
  1 coursely chopped rib of celery
  1 quartered, large onion
  1 coursely chopped, large carrot
  Salt and pepper
  2 medium onions, thinly sliced
  2 medium potatoes, cut into 1/4-inch slices
  2 large carrots, cut into 1/4-in slices
  Potpie squares (or kluski noodles)
  small handful of chopped fresh parsley
  3 tablespoons flour
  3 tablespoons cold water
  two or three pinches of saffron


Cook chicken in water with celery, carrot, 1 onion, bay leaf, salt, and pepper. Simmer it with the lid on until done, for about an hour.This is the stews broth. Take the chicken out to cool.

Skim the fat off of the broth. Strain the broth and discard the celery, carrot, onion, and bay leaf. Taste broth for seasoning and add additional salt and pepper if needed. I also add garlic powder but thats a matter of taste. Add the saffron grains.
When the chicken is cool enough to handle, take all the meat from the bones and cut it into bite sized pieces. Discard skin and bones.
Bring chicken broth to a boil in a big pot. Add  chicken. When the broth is boiling, layer the potpie squares into the broth, one by one. Alternate with layers of potato and onion and carrots. Push down each layer gently, so the liquid will cover it.

Turn down the heat so it will simmer. Cover the pot. Stir gently every so often, so the noodle squares will not stick together, for about 20 minutes.

Add parsley and saffron. Stir gently. The saffron will give the broth a gorgeous yellow color and an intensely unique and subtle flavor. Simmer for five more minutes. Make paste from flour and water. Add this to broth to thicken. Cook and stir gently another five minutes until a bit thicker.

Spoon into bowls and serve hot.

Chocolate Covered Frozen Bananas


Although there are much more complicated ways to do this and also ways that use top of the line chocolate, my lil guy couldnt tell Godiva from Hersheys or Nestles. When he wants a frozen chocolate covered banana he wants it yesterday. So we do ours with Magic Shell and sprinkles. He gets the fun of rolling them in the chocolate and sprinkles, nuts etc all on his own and they only take a few minutes. Since we always have bananas in the house they have also proven to be a great way to keep my lil man and his friends occupied for a while when they decide they are bored with the video games, fort building and tad pole catching. so although I prefer my strawberries and such dipped in a much richer tastier chocolate, my son thinks these are the best!!

What You Need

Frozen bananas or mini bananas (on sticks) (i use popcycle sticks or 1/2 a wooden shishkabob stick) You may want to cut large bananas in half before inserting stick and freezing, they are easier for little handles to handle.

Magic shell chocolate, Peanut butter chocolate, chocolate peanut butter, orange creamcycle and/or vanilla cupcake flavored, depending on your preference

Sprinkles in asst. colors or crushed nut or angel flake coconut

Empty magic shell into bowls good for dipping, roll banana into magic shell and if necessary spoon additional over banana to cover. Immediately roll in desired topping and then return to freezer for a few minutes till magic shell sets.

Peanut butter~Peanut Butter chip Cookie Yummys! and Orange Cranberry Delectable Muffins


I get more requests for these cookies from friends and friends of family members. They last all of ten minutes in my house, but then again, so do most of my baked goods. If you like chocolate, and let's face it, who doesnt like chocolate? You can drizzle the tops of the cookies with some melted chocolate.

Cranberries and Orange come together in these muffins to explode with delectable flavor. Top them off with some orange glaze and a drizzle of chocolate and you have yourself a gourmet tasting dessert.

Pictured here with out chocolate drizzle or glaze, since my daughter Brittney prefers hers glaze free : )


Peanut Butter, Peanut butter chip cookies


1 stick unsalted butter, softened
1/2 cup packed dark brown sugar
1/2 cup granulated sugar
1 cup peanut butter, smooth or chunky
1 large egg
1/2 teaspoon salt
1/2 teaspoon baking soda
1/2 teaspoon vanilla
1 1/2 cups sifted flour—if you don’t sift, use 1 1/3 cup
1 1/2 cups peanut butter chips (you can add more or less, or if you like you can mix with chocolate chip and/or white chocolate chips. You can also add crushed walnuts or pecans)

Preheat oven to 350 degrees.

Beat the butter and both sugars together. Beat in the peanut butter and egg; Scrape sides of bowl and beat in the salt, baking soda and vanilla. When well blended, add flour and stir until it is blended. Stir in the chips.

Shape dough into 1-inch balls and arrange on ungreased/unlined cookie sheets about 2 1/2-inches apart. Flatten balls with a fork dipped in sugar making criss-cross patterns; Bake for 10-12 minutes or until slightly browned around the edges.

Makes about 3 dozen

**If you only have salted butter you can use that, but reduce the salt in the recipe to about 1/4 teaspoon.


Orange Cranberry Muffins


2 cups flour
1 cup sugar
1 tsp baking soda
1/2 tsp baking powder
1/2 tsp salt
3/4 cup orange juice, freshly squeezed works best
1 tbsp orange zest
2 tbsp vegetable oil
1 large egg
1 1/4 cups cranberries, fresh or frozen (unthawed)
1/4 cup dried cranberries

Preheat oven to 375F and line a 12 cup muffin pan with paper liners.
Whisk together flour, sugar, baking powder, baking soda and salt in a large mixing bowl. Make a well, then add in in orange juice, orange zest, oil and egg and whisk everything together until just combined. Stir in whole and dried cranberries. Divide evenly into prepared muffin cups.
Bake for 14-16 minutes or until a toothpick inserted in the center of a muffin comes out clean. Turn onto wire rack to cool.Once slightly cooled, dip tops into orange glaze and when that dries drizzle with chocolate in zig zag fashion. You can also decorate with orange zest.


Orange Glaze

Stir together powdered sugar and water to desired consistancy. (thicker for glaze, thinner for drizzle) add pure orange extract little by little till desired flavor is achieved.

Chicken Pot Pie


Just recently I had a Houseparty party for Kraft Philadelphia Cooking Cremes, One of the dishes I prepared using one of their cooking cremes was Chicken Pot pie. Of course I added to the recipe provided,(my changes and additions are in bold) and the pot pies turned out delicious. My family loved them and yet....still prefer my version to theirs. I will include both recipes.

Kraft Philadelphia Savory Garlic Chicken Pot Pie
Makes 2 pies, serving about 10


2 lbs boneless skinless chicken breasts (cut into bite size pieces)
4 cups frozen mixed veggies, thawed and drained
2 tubs Philadelphia Savory Garlic Cooking Creme
2 ready to use pie crusts (I like mine to have top and bottom crust but you can use only a top crust and use an oven safe baking dish as bottom "crust")

I also added salt, pepper, minced onion, garlic powder
I also added melted butter toward end of baking


Brown chicken in a non stick skillet, season with salt, pepper, minced onion, and garlic powder. Cook all the way thru. Add veggies and cook about 2 minutes or until heated thru. Stir in cooking creme. Spoon into bottom crust or baking dish. Add top crust and pinch edges to seal. slit top to vent. Repeat for second pie. Place pies on baking sheet. bake in preheated 400 degree oven for 25 to 30 minutes. During last ten minutes of baking remove from oven and baste crust all the way to edges with melted butter and sprinkle with minced onion. Return to oven for final ten minutes. Remove and let cool before cutting.


For my own recipe I use fresh veggies cooked slightly tender then added, and instead of adding philly cooking creme i use my own homemade gravy. Basically all the steps are the same only changing up these two things. If you are pressed for time or do not have homemade gravy available you can use your favorite store bought gravy, if you do this though i suggest using gravy purchased at boston market or kfc the flavor is much better than canned or jarred grocery store gravies. Although nothing compares to homemade.

Tuesday, March 22, 2011

Back in the swing.....

seems I am finally back in the swing of things. Spring break brought spring cleaning and then celebrating my birthday for an entire week straight. My kids were amazing and took me to eat bought me the most wonderful gifts and just made me happy. I hadnt cooked in so long I honestly couldnt wait to get back to it! Yesterday was my actual birthday and I found myself baking cranberry orange muffins with orange glaze, miniature chocolate cream pies, key lime pie, peanut butter cookies with peanut butter chips and making the best homemade chicken pot pies. (Recipes should be up this evening along with pics of the goodies) It was soo good to be back in the kitchen again! I was asked why I was doing all the work on my birthday and my daughter said it so well...."This is where she likes to be, it keeps her happy, stress free and in an awesome mood" So it's back to the kitchen for me. Although I loved being spoiled, I love being the one to spoil the rest even more : )

Spring is here....let's see what delicious dinners and desserts I can find <3

Friday, March 11, 2011

friends...or were they

Funny how you go through life thinking certain people are your friends and then all of asudden one day you find out that they are doing things behind your back to cause you harm and stress and hurt. So very sad. If youre smart you clear away the drama because in all honesty these people were never your real friends. I am about to embark on yet another new chapter in my life and I am bound and determined that noone will deter me from it. Some people forget just how strong I am and just how much of a fighter I can be.

With that all said I shall move on to better topics. Spring break begins today and I plan on enjoying mine with my kids. Hope all of you who will be on break too, make yours an adventure : )

Wednesday, March 9, 2011

Portobello Mushroom Pizzas..Simply Incredible


Traditional pizza is great however if you want a nice twist to a personal size pizza this recipe is great! Topped with your all time favorites you can personalize them anyway you want..I am posting the recipe as I enjoy them but you can add or subtract to it to make them your way! Once you have tasted them you can guarantee this won't be a once in awhile meal : )


Ingredients:


4 Large Portobello Mushrooms, stems removed and dark gills scraped away
Your Favorite marinara sauce (I make homemade and freeze it in small containers)
Shredded mozzerella cheese
Parmesian and romano cheese grated
Slices of favorite pepperoni
red onion, chopped
green bell pepper, diced
garlic clove, minced
basil, oregano, salt, pepper
olive oil (i use extra virgin)

Saute onion, peppers, garlic in olive oil just till tender.

Heat oven to 425 F. Brush an aluminum foil-lined baking sheet lightly with olive oil. Place mushrooms on sheet and bake just until fork tender . Remove and Increase heat to broil. Top concave side of mushroom with tomato sauce, cheese and toppings. Sprinkle with spices. Place under broiler for 1 minute or until cheese melts and bubbles.